Difference between revisions of "User:Florb"
m (added organisation for guide) |
m (→ID Edit Guide: rewritten) |
||
| Line 25: | Line 25: | ||
<div class="mw-collapsible-content"> | <div class="mw-collapsible-content"> | ||
'''Authorization:''' | '''Authorization:''' | ||
| − | |||
| − | |||
| + | *INSERT YOUR ID ON GREEN AND THE TARGET ID ON PURPLE | ||
| + | *press log in(red) | ||
[[File:ID Console Interface 1 Guide.png|480px]] | [[File:ID Console Interface 1 Guide.png|480px]] | ||
'''Access Modification:''' | '''Access Modification:''' | ||
| − | + | ||
| + | *grant access to seperate rooms (light blue) | ||
| + | *change job assignment (orange) | ||
| + | *'''DONT FORGET TO LOG OUT''', otherwise everyone can use the console | ||
[[File:ID Console Interface 2 Guide.png|640px]] | [[File:ID Console Interface 2 Guide.png|640px]] | ||
'''Job assignment:''' | '''Job assignment:''' | ||
| − | + | *select new job assinment for target ID | |
| + | *select Custom job name for example "Liberator of Maints"(bottom) | ||
| + | *to remove your and the target ID '''ALT CLICK THE CONSOLE''' | ||
[[File:ID Console Interface 3 Guide.png|640px]] | [[File:ID Console Interface 3 Guide.png|640px]] | ||
| Line 51: | Line 56: | ||
These are the steps for the command console <br> | These are the steps for the command console <br> | ||
<div class="mw-collapsible-content"> | <div class="mw-collapsible-content"> | ||
| + | |||
| + | '''Select ID Program:''' | ||
| + | |||
| + | *select ID-Program(red), the display of the console will change | ||
| + | *if the program is not available you may need to install the ID-software first (see tablets) | ||
[[File:Command Console Interface 1 Guide.png]] | [[File:Command Console Interface 1 Guide.png]] | ||
| + | |||
| + | '''Authorization:''' | ||
| + | *KEEP YOUR ID IN YOUR ID SLOT ON YOUR JUMPSUIT AND LOG IN | ||
| + | *do not insert your own ID in the console. | ||
| + | |||
[[File:Command Console Interface 2 Guide.png]] | [[File:Command Console Interface 2 Guide.png]] | ||
| + | |||
| + | '''ID Modification:''' | ||
| + | *In this Interface you can change the Name of the ID (purple), | ||
| + | *grant access to seperate rooms or departments(light blue), | ||
| + | *all access and No access(dark blue). | ||
| + | *Use a predefined Job (orange) | ||
| + | *to remove the target ID '''ALT CLICK THE CONSOLE''' | ||
| + | *'''DONT FORGET TO LOG OUT''' | ||
[[File:Command Console Interface 3 Guide.png]] | [[File:Command Console Interface 3 Guide.png]] | ||
| Line 63: | Line 86: | ||
===Tablets=== | ===Tablets=== | ||
[[File:Tablet_brown.png|64px]] | [[File:Tablet_brown.png|64px]] | ||
| − | |||
| − | |||
<div class="toccolours mw-collapsible mw-collapsed"> | <div class="toccolours mw-collapsible mw-collapsed"> | ||
These are the steps for the Tablet modifications <br> | These are the steps for the Tablet modifications <br> | ||
<div class="mw-collapsible-content"> | <div class="mw-collapsible-content"> | ||
| + | '''Software Installation:''' | ||
| + | *if the "ID-Card Modification" inst preinstalled select software download tool(red) | ||
[[File:Tablet Interface 1 Guide.png]] | [[File:Tablet Interface 1 Guide.png]] | ||
| + | '''Download program:''' | ||
| + | *download ID-Card Modification, this will take a few seconds | ||
| + | *after it is downloaded exit the program by pressing the x on the or minimize it(top right) | ||
[[File:Tablet Interface 2 Guide.png]] | [[File:Tablet Interface 2 Guide.png]] | ||
| + | '''Select ID Program:''' | ||
| + | *select ID-Card Modification program | ||
[[File:Tablet Interface 3 Guide.png]] | [[File:Tablet Interface 3 Guide.png]] | ||
| + | '''Authorization:''' | ||
| + | *KEEP YOUR ID IN YOUR ID SLOT ON YOUR JUMPSUIT AND LOG IN | ||
| + | *do not insert your own ID in the console. | ||
| + | |||
[[File:Tablet Interface 4 Guide.png]] | [[File:Tablet Interface 4 Guide.png]] | ||
| + | '''ID Modification:''' | ||
| + | *insert the target ID (purple) | ||
| + | *grant access to seperate rooms or departments(light blue) | ||
| + | *change job assignment (orange) | ||
| + | *to remove the target ID '''ALT CLICK THE CONSOLE''' | ||
| + | *'''DONT FORGET TO LOG OUT''' | ||
| + | |||
[[File:Tablet Interface 5 Guide.png]] | [[File:Tablet Interface 5 Guide.png]] | ||
Revision as of 06:49, 26 May 2021
Every worker of Space Station 13 is issued an identification card. Your ID has your name, occupation, and a device that broadcasts your access to the station's autonomous systems, which is used both to identify the holder and open up airlocks the worker has access to. For example, the Quartermaster has access to the Cargo Bay and Quartermaster's Office, while Assistants, for example, do not. ID cards can have their access modified by the Captain or Head of Personnel. When your face is covered your ID is the only way of identifying you.
Types of ID cards
 Standard ID - Standard identification card issued to the general staff.
 Command ID - Special silver identification card issued to the Heads of Staff. These ID's allow access to the Bridge, have the ability to call/recall the Escape Shuttle, edit access permissions on other ID cards, as well as having access specific to each head.
 Captain's ID - The Captain's gold-coloured all-access ID card. A spare will be present in a safe in the CIC.If there is no Captain present at the start of the shift a document with the code for said safe will be inserted in one of the Heads of Staff's Inventory.
 Centcom ID - Identification card issued only to Centcom officials, including Death squad officers.
 Prisoner ID - Identification card issued to prisoners, so they can be identified on the crew monitoring console and keep track of labor points. Has no access.
ID Edit Guide
There are three ways of editing ID-Access: By modifying them in a Tablet, in an ID console or Command console. Here is a quick guide to the steps to take, since it's often not very intuitive.
ID-Console
Detailed below are the Steps for the ID-Console
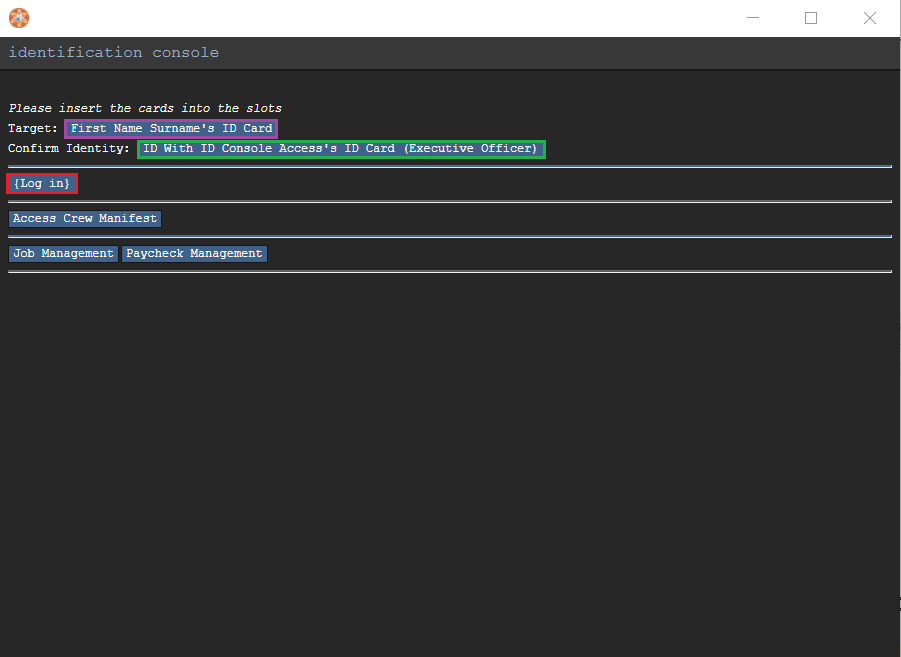
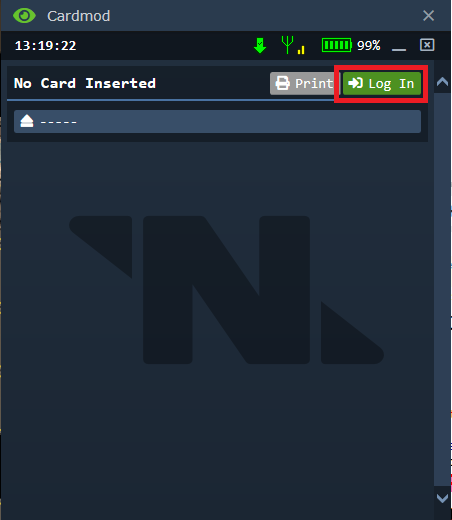
Authorization:
- INSERT YOUR ID ON GREEN AND THE TARGET ID ON PURPLE
- press log in(red)
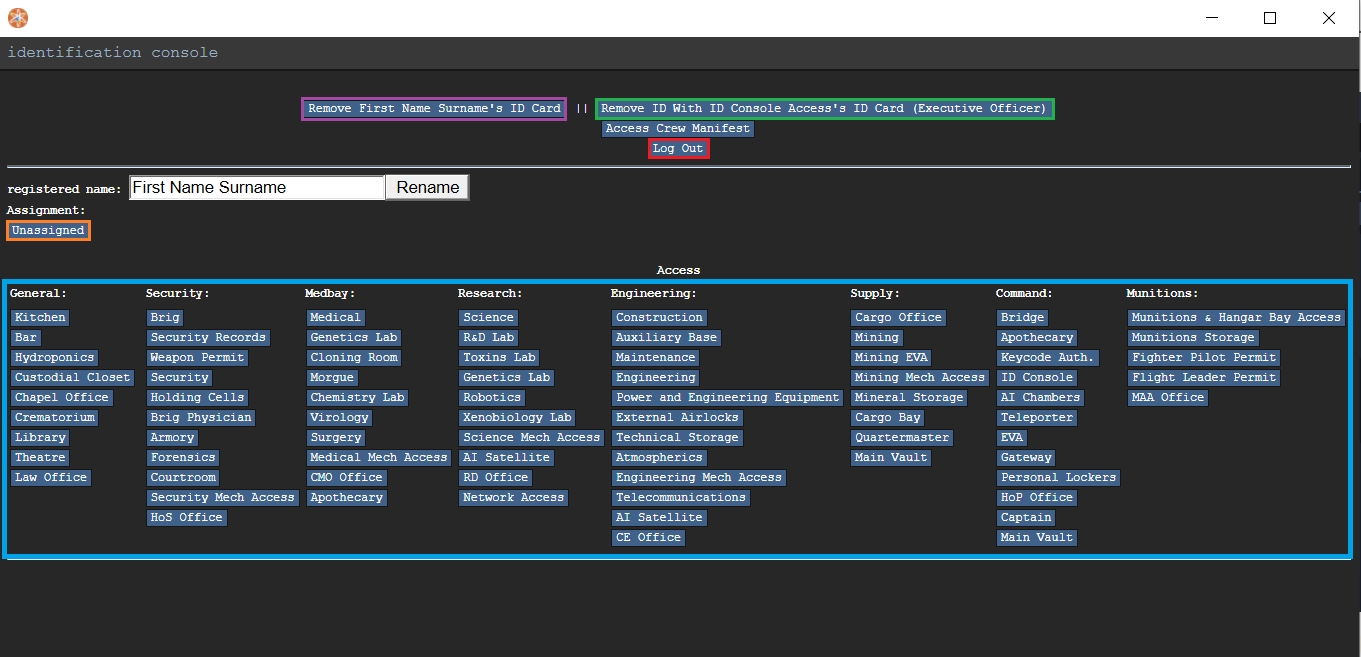
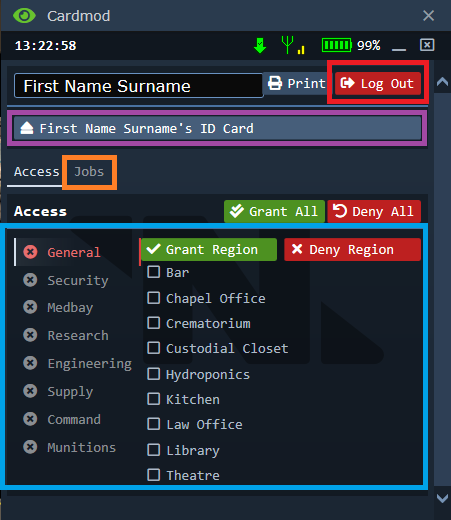
Access Modification:
- grant access to seperate rooms (light blue)
- change job assignment (orange)
- DONT FORGET TO LOG OUT, otherwise everyone can use the console
Job assignment:
- select new job assinment for target ID
- select Custom job name for example "Liberator of Maints"(bottom)
- to remove your and the target ID ALT CLICK THE CONSOLE
Command Console
These are the steps for the command console
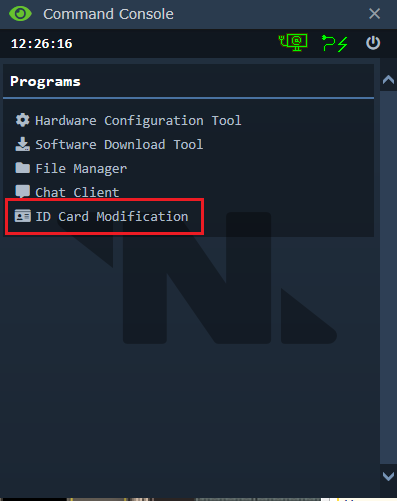
Select ID Program:
- select ID-Program(red), the display of the console will change
- if the program is not available you may need to install the ID-software first (see tablets)
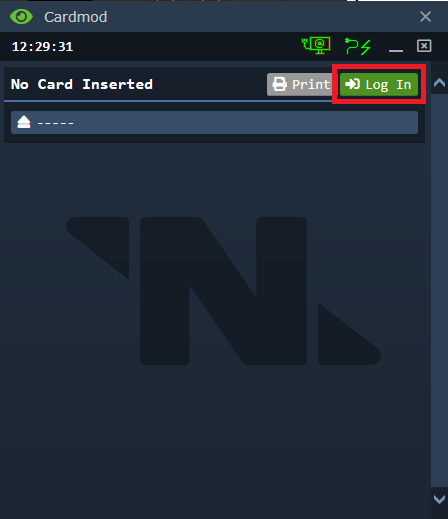
Authorization:
- KEEP YOUR ID IN YOUR ID SLOT ON YOUR JUMPSUIT AND LOG IN
- do not insert your own ID in the console.
ID Modification:
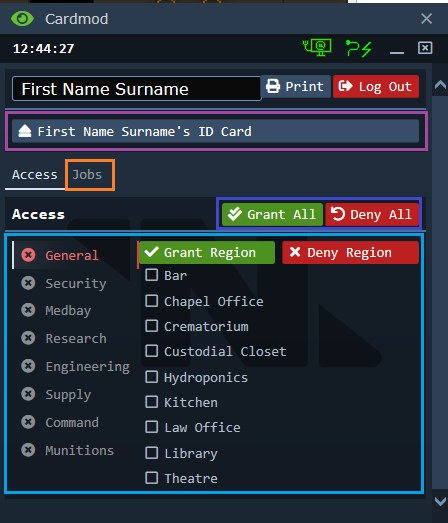
- In this Interface you can change the Name of the ID (purple),
- grant access to seperate rooms or departments(light blue),
- all access and No access(dark blue).
- Use a predefined Job (orange)
- to remove the target ID ALT CLICK THE CONSOLE
- DONT FORGET TO LOG OUT
Tablets
These are the steps for the Tablet modifications
Software Installation:
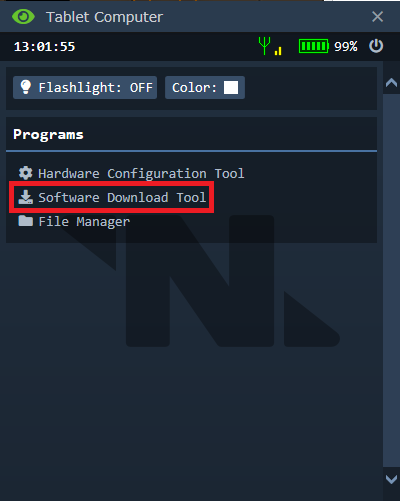
- if the "ID-Card Modification" inst preinstalled select software download tool(red)
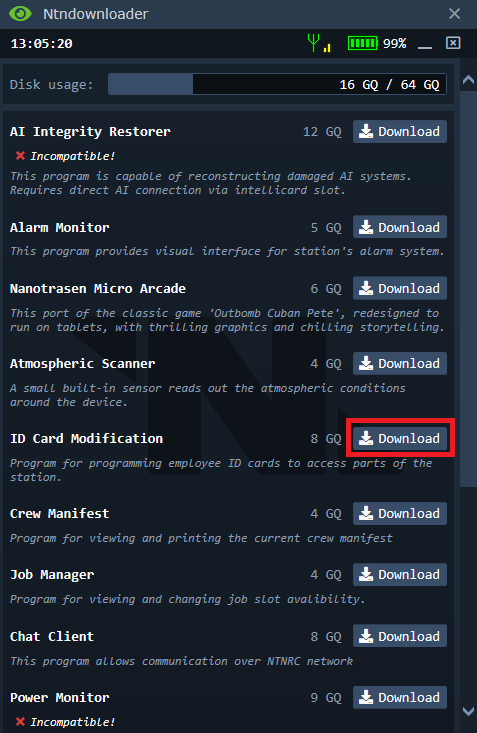
- download ID-Card Modification, this will take a few seconds
- after it is downloaded exit the program by pressing the x on the or minimize it(top right)
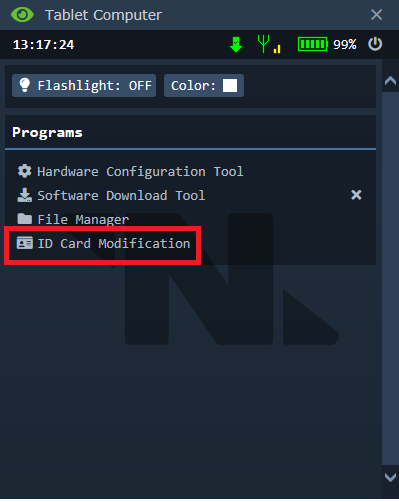
- select ID-Card Modification program
- KEEP YOUR ID IN YOUR ID SLOT ON YOUR JUMPSUIT AND LOG IN
- do not insert your own ID in the console.
- insert the target ID (purple)
- grant access to seperate rooms or departments(light blue)
- change job assignment (orange)
- to remove the target ID ALT CLICK THE CONSOLE
- DONT FORGET TO LOG OUT
Interactables
Trivia
to do: add guides to each ID-Mods step by step new id pictures guide pictures add things that are id interactable trivia for acces, like who can hail other ships Formatting to set to the right

