Difference between revisions of "User:Grabowski"
Bokkiewokkie (talk | contribs) m (changes mentions of nano_glass to nanoglass) |
m (Adds the new pictures, plus adds in a few final touches) |
||
| Line 1: | Line 1: | ||
==== Railgun ==== | ==== Railgun ==== | ||
| − | NT-STC4 coaxial railgun is a powerful weapon which fires directly out of the front of the ship, its projectiles are entirely unguided, so the firing solution must be perfect. It has a ammo capacity of 4 shots. It fires M4 NTRS 400mm teflon coated tungsten rounds, commonly known as Railgun Shells. | + | NT-STC4 coaxial railgun is a powerful weapon which fires directly out of the front of the ship, its projectiles are entirely unguided, so the firing solution must be perfect. It has a ammo capacity of 4 shots. It fires M4 NTRS 400mm teflon coated tungsten rounds, commonly known as Railgun Shells. '''Warning:''' It deafens when firing, as such you will need ear protection when working around them. |
{| class="wikitable" border="1" cellspacing="0" style="width:80%; background-color:#FFFFFF;" | {| class="wikitable" border="1" cellspacing="0" style="width:80%; background-color:#FFFFFF;" | ||
| Line 7: | Line 7: | ||
! style='background-color:#99ccff'|How to build | ! style='background-color:#99ccff'|How to build | ||
|- | |- | ||
| − | |[[File:Metal_r.png|Plasteel]]x6<br>[[File:Nanoglass.png|Nanocarbon glass]]x4<br>[[File:Railgun rail.png|Railgun rail]]x2<br>[[File:Capacitor.png|Capacitator]]x4<br>[[File:CableCoils.png|Cable]]x4<br>[[File: | + | |[[File:Metal_r.png|Plasteel]]x6<br>[[File:Nanoglass.png|Nanocarbon glass]]x4<br>[[File:Railgun rail.png|Railgun rail]]x2<br>[[File:Capacitor.png|Capacitator]]x4<br>[[File:CableCoils.png|Cable]]x4<br>[[File:FiringBoard.png|Firing electronics]]x1<br>[[File:Loading tray.png|Railgun loading tray]]x1<br>[[File:Wrench.png|Wrench]]<br>[[File:Welder.png|Welding tool]]<br>[[File:Screwdriver tool.png|Screwdriver]] |
|style="vertical-align: top; padding: 10px;"| | |style="vertical-align: top; padding: 10px;"| | ||
# Build Railgun frame from 4 '''Plasteel Sheets''' | # Build Railgun frame from 4 '''Plasteel Sheets''' | ||
| Line 58: | Line 58: | ||
==== Magnetic Accelerator ==== | ==== Magnetic Accelerator ==== | ||
| − | The Radial MAC cannon is an extremely powerful electromagnet which can accelerate a projectile to devastating speeds. It has a ammo capacity of 1 shot. It fires M4 NTRS 400mm teflon coated tungsten rounds, commonly known as Railgun Shells | + | The Radial MAC cannon is an extremely powerful electromagnet which can accelerate a projectile to devastating speeds. It has a ammo capacity of 1 shot. It fires M4 NTRS 400mm teflon coated tungsten rounds, commonly known as Railgun Shells. '''Warning:''' It deafens when firing, as such you will need ear protection when working around them. |
{| class="wikitable" border="1" cellspacing="0" style="width:80%; background-color:#FFFFFF;" | {| class="wikitable" border="1" cellspacing="0" style="width:80%; background-color:#FFFFFF;" | ||
| Line 65: | Line 65: | ||
! style='background-color:#99ccff'|How to build | ! style='background-color:#99ccff'|How to build | ||
|- | |- | ||
| − | |[[File:Metal_r.png|Plasteel]]x6<br>[[File:Nanoglass.png|Nanocarbon glass]]x4<br>[[File:Capacitor.png|Capacitor]]x4<br>[[File:Suppressor.png|MAC barrel]]x1<br>[[File:CableCoils.png|Cable]]x4<br>[[File: | + | |[[File:Metal_r.png|Plasteel]]x6<br>[[File:Nanoglass.png|Nanocarbon glass]]x4<br>[[File:Capacitor.png|Capacitor]]x4<br>[[File:Suppressor.png|MAC barrel]]x1<br>[[File:CableCoils.png|Cable]]x4<br>[[File:FiringBoard.png|Firing Electronics]]x1<br>[[File:Loading tray.png|Railgun loading tray]]x1<br>[[File:Wrench.png|Wrench]]<br>[[File:Welder.png|Welding tool]]<br>[[File:Screwdriver tool.png|Screwdriver]] |
|style="vertical-align: top; padding: 10px;"| | |style="vertical-align: top; padding: 10px;"| | ||
# Build a MAC frame from 4 '''Plasteel Sheets''' | # Build a MAC frame from 4 '''Plasteel Sheets''' | ||
| Line 123: | Line 123: | ||
! style='background-color:#99ccff'|How to build | ! style='background-color:#99ccff'|How to build | ||
|- | |- | ||
| − | |[[File:Metal_r.png|Plasteel]]x4<br>[[File:Nanoglass.png|Nanocarbon glass]]x6<br>[[File: | + | |[[File:Metal_r.png|Plasteel]]x4<br>[[File:Nanoglass.png|Nanocarbon glass]]x6<br>[[File:FiringBoard.png|Firing Electronics]]x1<br>[[File:Welder.png|Welding tool]]<br>[[File:Screwdriver tool.png|Screwdriver]]<br>[[File:Wrench.png|Wrench]]<br> |
|style="vertical-align: top; padding: 10px;"| | |style="vertical-align: top; padding: 10px;"| | ||
# Build Torpedo Tube frame from 4 '''Plasteel Sheets''' | # Build Torpedo Tube frame from 4 '''Plasteel Sheets''' | ||
| Line 166: | Line 166: | ||
{| class="wikitable" border="1" cellspacing="0" style="width:80%; background-color:#FFFFFF;" | {| class="wikitable" border="1" cellspacing="0" style="width:80%; background-color:#FFFFFF;" | ||
| − | !rowspan="2" style='background-color:#cce6ff;'|[[File:PDCrack.png| | + | !rowspan="2" style='background-color:#cce6ff;'|[[File:PDCrack.png|96px]]<br>PDC rack |
! style='background-color:#99ccff; width:20%'|Requires to build | ! style='background-color:#99ccff; width:20%'|Requires to build | ||
! style='background-color:#99ccff'|How to build | ! style='background-color:#99ccff'|How to build | ||
|- | |- | ||
| − | |[[File:Metal.png|Metal]]x4<br>[[File:CableCoils.png|Cable]]x5<br>[[File:Circuitboard.png|PDC Mount board]]x1<br>[[File:Micro_Manipulator.png|Micro Manipulator]]x4<br>[[File:Capacitor.png|Capacitor]]x2<br>[[File:Matter_bin.png]]x3<br>[[File: | + | |[[File:Metal.png|Metal]]x4<br>[[File:CableCoils.png|Cable]]x5<br>[[File:Circuitboard.png|PDC Mount board]]x1<br>[[File:Micro_Manipulator.png|Micro Manipulator]]x4<br>[[File:Capacitor.png|Capacitor]]x2<br>[[File:Matter_bin.png]]x3<br>[[File:FiringBoard.png|Firing electronics]]x1<br>[[File:Wrench.png|Wrench]]<br>[[File:Screwdriver tool.png|Screwdriver]]<br> |
|style="vertical-align: top; padding: 10px;"| | |style="vertical-align: top; padding: 10px;"| | ||
# Build PDC rack frame from 4 '''Metal''' | # Build PDC rack frame from 4 '''Metal''' | ||
Revision as of 11:36, 2 December 2020
Railgun
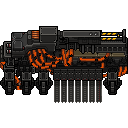
NT-STC4 coaxial railgun is a powerful weapon which fires directly out of the front of the ship, its projectiles are entirely unguided, so the firing solution must be perfect. It has a ammo capacity of 4 shots. It fires M4 NTRS 400mm teflon coated tungsten rounds, commonly known as Railgun Shells. Warning: It deafens when firing, as such you will need ear protection when working around them.
Magnetic Accelerator
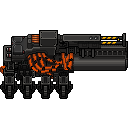
The Radial MAC cannon is an extremely powerful electromagnet which can accelerate a projectile to devastating speeds. It has a ammo capacity of 1 shot. It fires M4 NTRS 400mm teflon coated tungsten rounds, commonly known as Railgun Shells. Warning: It deafens when firing, as such you will need ear protection when working around them.
Torpedo Tube
The M4-B Torpedo tube is a weapon system that's employed by nigh on all modern ships. It's capable of delivering a self-propelling warhead with pinpoint accuracy to utterly annihilate a target. It has an ammo capacity of 1 torpedo. It fires NTP torpedos, which are hand crafted by MTs, as shown above.
| File:Torptube.png Torpedo Tube |
Requires to build | How to build | |
|---|---|---|---|
| |||
| How to deconstruct | |||
| Tools |
| ||
PDC / Flak rack
A small interface and loading system for ship mounted Point Defense or Flak guns. It fends off incoming torpedos and other projectiles. It is rare to see a ship without any of these. The PDC rack can hold 300, while the Flak rack can hold 100 shots.
| 96px PDC rack |
Requires to build | How to build | |
|---|---|---|---|
| |||
| How to deconstruct | |||
| Tools |
| ||

