User:Qbopper
Starter Guide
What is SS13?
| Tuterr, the Private Eye says: "Hmph. Fresh off the boat from Nanotrasen's recruitment office, huh? Let me tell you something, kid. You won't last five minutes on this floating deathtrap without help. You're as likely to be left for dead in a dark maintenance tunnel riddled with bullet holes as you are to get out of here alive. Lucky for you, I'm in a helpful mood today." |
Space Station 13 is a multiplayer sandbox that has a heavy focus on player interaction. In the year 2257, the megacorporation Nanotrasen has employed you as a staff member onboard their latest state of the art research station. Nanotrasen claims to be researching plasma, a mysterious new substance, but rumors are abound that the station is little more than a twisted social experiment...
Players are assigned a role onboard the station - from a scientist performing research and development of new technologies, to a lowly janitor, there's a ton of interesting ways to play. More importantly than assigning jobs, the game also randomly chooses a round type. Ranging from an all out assault on the station by nuclear operatives, sinister cult sacrificing crewmembers to summon their god, or just some good ol' fashioned traitors, every round on Space Station 13 is different.
Before Playing
It's important to read the rules before connecting for the first time. There's a lot on the page, but for now you only need to concern yourself with the Main Rules. Some common new player mistakes to avoid include:
- Asking questions in OOC that are directly related to what's happening in the round. For example, "Why did I just get killed by the clown?". (It's okay to discuss a previous round in OOC)
- Not following the name format - though there are exceptions, players are asked to use a Firstname Lastname format when creating a character.
The admin team generally tries to give players benefit of the doubt, so it's okay to mess up. As long as you're polite and willing to learn from your mistakes, you won't be in trouble.
This guide is designed for ease of use for first time players, so non-essential information is segregated to expandable text boxes. Reading these isn't necessary to get into the game, but it's recommended.
One last point: please, remember the human. Everyone is here to play a game they enjoy, so keep that in mind before you bash someone's brains in with a toolbox because they took your multitool.
Setting Up
Make your way to the BYOND download page and download the beta client - the stable client is known to cause bugs in game. Once you've downloaded, installed, and logged into the client, feel free to close it - we won't be needing to use it directly anymore. Once you're set up, choose a server to join:
- Server #1 (Sybil): <byond server=game.tgstation13.org port=1337>byond://game.tgstation13.org:1337</byond>
- Server #2 (Bagil): <byond server=game.tgstation13.org port=2337>byond://game.tgstation13.org:2337</byond>
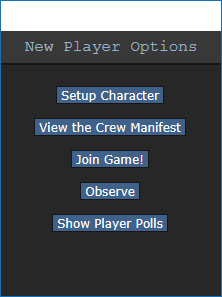
Once you've connected to a server, you'll be greeted by a small popup window labelled New Player Options.
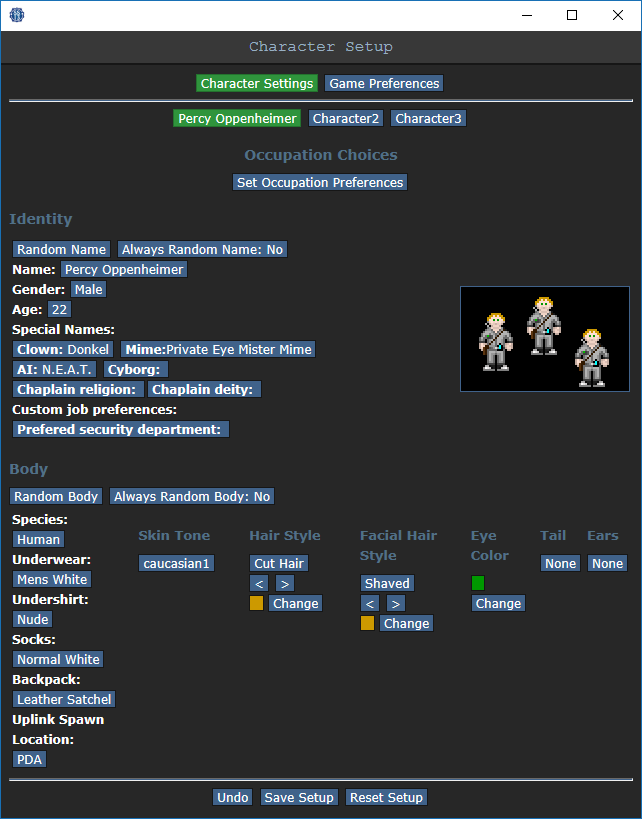
If this is your first time playing on /tg/station, you'll need to create a character. Click on the Setup Character button, and the character creation menu will open.
You don't need to worry about Special Names, Custom job preferences, Uplink Spawn Location, or Species - for now, make sure you're a human, and edit your appearance as you see fit. There's no difference between clothing/backpack options other than appearance, so pick what you think looks best.
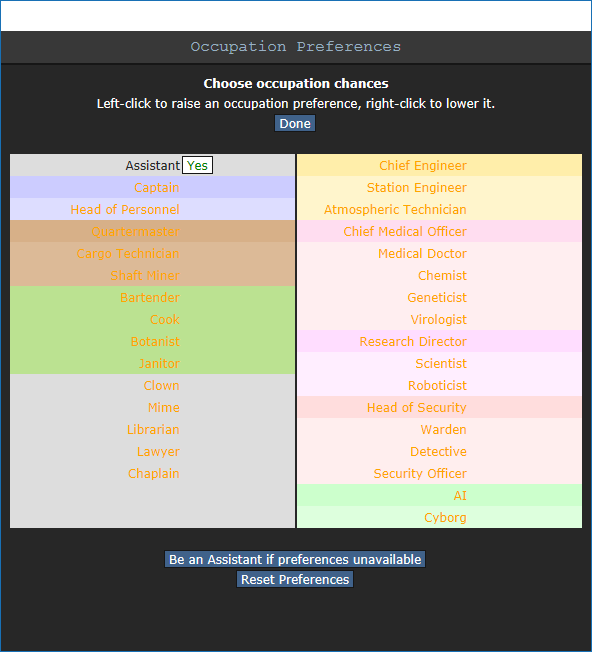
Once you've finished editing your appearance, be sure to press the Save Setup button at the bottom of the window. Next, press the Set Occupation Preferences button.
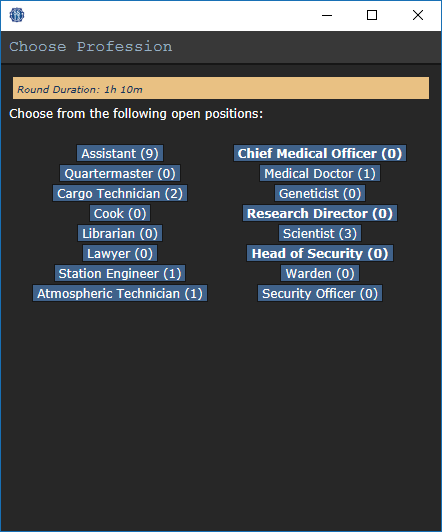
| Tuterr, the Private Eye says: "You're brand new here, so make sure you sign up as an Assistant. Nanotrasen usually has checks to make sure fresh meat doesn't get to be the Captain, but if you manage to end up in that position, you'll probably be just another case for me to solve." |
If the button next to Assistant is a red NO, click it once so that it says YES in green text. This sets your job to be assistant, no matter what.
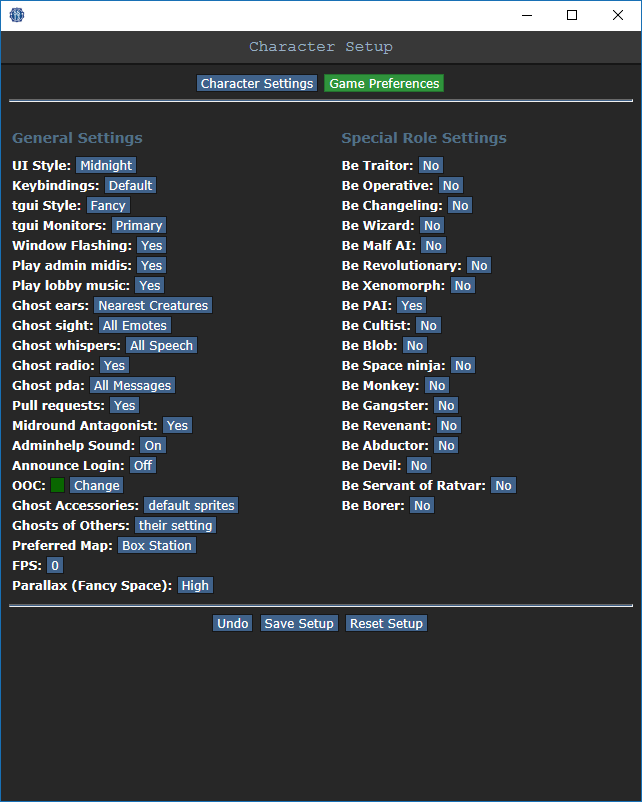
After that, press Done, then, Save Setup. Then click on Game Preferences at the top of the character creation screen. The menu will change and have a big list of options.
Make sure all of the Special Role Settings are set to No. (These control optional settings, like choosing if you'd like to roll for a traitor role - they assume you know how to play the game and are important to the round, so we want them off for now.) More importantly, change the Keybindings option to "Hotkeys". This guide will assume you're using this control scheme, as it provides quicker functions for actions than the default controls. Most of the options here are relatively self explanatory or irrelevant, so once you're done, click Save Setup one last time.
Joining the Game
Now that you've created your character, you're ready to join the game. /tg/station has multiple maps that the server will occasionally change to. The "standard" station layout is Box Station, but the game can also take place on Meta Station, Pubby Station, Delta Station, or Omega Station. You can visit the individual wiki pages to see the layout of a specific map.
There's two possible menus here - the lobby screen will either display a list that has Join Game! or a Ready/Not Ready toggle.
Before you do anything else, take a look at the top right of the game window. You'll see some tabs labelled Status, Lobby, Admin, IC, OOC, Object, and Preferences. The most important taabs are the Status and Admin tabs. If you're using internals (an oxygen tank and mask), the Status tab tells you the remaining air pressure - useful for avoiding death by suffocation. The Admin tab contains the Adminhelp button, used to contact admins directly if you have a question or believe someone is breaking the rules.
- Status
- Displays important info such as your ping, the current map, pressure remaining in airtanks, etc.
- Admin
- Contains buttons that allow you if any admins are online, and most importantly, to send a message directly to the admins (the Adminhelp button). If no admins are online, the message will be forwarded to the admin IRC channel.
- IC
- Stands for "In Character". Usually won't use this. (The Pray button allows you to send a message to any admins online in character - often used for "communicating with the gods". Another useful button is Rest, which lets you go prone at will.)
- OOC
- Stands for "Out of Character". Again, rarely needs to be used. Various functions that are related to the game, but not something your character does (eg. seeing the number of players online).
- Object
- Never used. Contains buttons to manipulate objects (eg. drag/stop dragging an object), but there are hotkeys to do these things much faster.
- Preferences
- Self explanatory - contains various options you can toggle on and off.
In the Status tab, take note of the map currently being played on the server. It'll be used later in the guide.
Interface 101
| Tuterr, the Private Eye says: ""Interface"? What the hell are you talking about, kid? "Blue buttons?" Geez, you've been here for five minutes and you're already cracking. Hmmm... *recorder crackles* Note to self - check atmospherics. Gas might be poisoned." |
The biggest barrier to entry in Space Station 13 is the controls. The UI is, at a glance, complex, and the controls are unintuitive. Thankfully, once it clicks, you'll never have an issue with it again. Don't let it overwhelm you - after a round or two of practice, you should be fine.
Although your control scheme was changed to Hotkeys in the Game Preferences menu, it may not have applied itself - if there is a large red bar going accross the bottom of the screen, click somewhere on the game window and press Tab. This is the manual toggle for hotkey mode - if the bar changes to white, you're good to go.
The top right of the screen contains the action tabs mentioned previously, and the bottom right is the text log. This is where you can see what people are saying, what's happening around you, and chat such as OOC or adminhelps. The bar along the bottom of the screen is the input bar, but since we're on Hotkeys mode we won't need to use it. There's quite a few HUD elements on the main screen, so let's break them down into sections. Don't worry if you can't memorize what everything does at once - you can always come back to this guide.
The backpack ![]() icon can be toggled to show your worn equipment.
icon can be toggled to show your worn equipment.
The belt ![]() , backpack
, backpack ![]() , and pocket
, and pocket ![]() icons are all storage locations.
icons are all storage locations.
The drop ![]() and throw
and throw ![]() icons do what the name implies. Dropping is self explanatory, but the throw button is a toggle - if it's on and you click somewhere, you'll throw the item in your hand at where you clicked.
icons do what the name implies. Dropping is self explanatory, but the throw button is a toggle - if it's on and you click somewhere, you'll throw the item in your hand at where you clicked.
The pull ![]() icon only appears when dragging something, and can be pressed to let go of the object.
icon only appears when dragging something, and can be pressed to let go of the object.
The internals ![]() icon can be clicked to enable/disable your internals (oxygen tank and breath mask).
icon can be clicked to enable/disable your internals (oxygen tank and breath mask).
The resist ![]() icon can be pressed to break out of grabs, restraints, and if you're on fire, is the "stop drop and roll" button.
icon can be pressed to break out of grabs, restraints, and if you're on fire, is the "stop drop and roll" button.
The run/walk toggle ![]() icon can be pressed to switch between running and walking. Running is faster, but walking has benefits, such as being able to walk over water without slipping - useful for when the janitor doesn't put wet floor signs down.
icon can be pressed to switch between running and walking. Running is faster, but walking has benefits, such as being able to walk over water without slipping - useful for when the janitor doesn't put wet floor signs down.
The crafting menu ![]() icon opens the crafting menu.
icon opens the crafting menu.
The talk wheel ![]() icon can be used to make your character instantly say one of the preset phrases.
icon can be used to make your character instantly say one of the preset phrases.
![]() Oxygen warning - The air you're breathing doesn't have enough oxygen.
Oxygen warning - The air you're breathing doesn't have enough oxygen.
![]() Pressure warning - Pressure levels are too high (red) or too low (black). Low and high pressures can kill you.
Pressure warning - Pressure levels are too high (red) or too low (black). Low and high pressures can kill you.
![]() Toxin warning - You are breathing in toxic gases.
Toxin warning - You are breathing in toxic gases.
![]() Fire warning - The air is hot enough to burn you.
Fire warning - The air is hot enough to burn you.
![]() Freeze warning - The air is cold enough to freeze you.
Freeze warning - The air is cold enough to freeze you.
![]() Temperature warning - You're too cold or too hot.
Temperature warning - You're too cold or too hot.
Controls
There might seem like quite a few controls, but don't worry - you'll only be using a few the majority of the time.
- Use WASD to move.
- Press T to talk.
- If you add a semicolon before anything else, you'll transmit your message to the general chat radio.
- You can speak on department specific radio channels - the format is the same for each, just with a different letter. To speak on the medical channel, for example, type :m before your message. (You can also use .m or #m)
- Press O for OOC chat.
- Be careful not to mix the two chat buttons up - your cry for help might end up going in OOC, where anyone can see it at any time.
- Press M to write an emote.
- This is for nonverbal actions - for example, writing "sighs." in the text box would show as "[Character Name] sighs."
- Click on objects in the game world to interact with them. For most, you'll need to be next to or ontop of the object.
- This is used for things such as interacting with computer terminals, picking up items, using an item on something, or attacking someone.
- Right click on something to open the context menu.
- This is slow and clunky, and you can usually perform most actions with hotkeys. There are a few examples of actions that can only be done with a right click, but they're far and few between.
- Hold Control and click on something to drag it.
- Hold Shift and click on something to examine it.
- Press X or Middle Mouse Button to change your selected hand.
- Your selected hand is the one that will pick up an object (if empty) or use the object in that hand (if holding something). You can tell which is selected by the small box around one of your hands.
Gameplay
| Tuterr, the Private Eye says: "You know, as much as I like to rib the fresh meat, it doesn't really matter if something happens to them - Nanotrasen thinks death is a waste of money, they'll just get cloned or something. What? Oh, shit, I gotta go. *click* You, uh, didn't hear that, right kid?" |
Before getting into anything else, it's important to note that since SS13 is such an open ended game that has other people in it, when you get in game and try to follow the guide, things may go wrong - the station might have been almost entirely consumed by a singularity, a traitor could attack you with a powerful weapon, or something no one could have predicted will kill you. It's important to not let death get to you - Rule 10 exists for a reason! There are multiple ways you can be brought back into the game - don't get frustrated if something happens.
There's a few specific concepts that are often stumbling blocks for newer players, so let's address those first.
ss13 specific concepts (hands, intent, clickdragging, damage/crit, combat)
what to do after learning how to play
avoiding bans

