Difference between revisions of "Guide to circuits"
imported>Pointlesswaste |
imported>Pointlesswaste |
||
| Line 162: | Line 162: | ||
* Small screens only show their data on examine. Screens show their data to the person holding the assembly when they load their data. Large screens show that data to anyone nearby, as well. They all have the same complexity, so use them according to your needs. For instance, something that gathers data when you point the assembly at something might be best to have a normal screen to tell you that data immediately. | * Small screens only show their data on examine. Screens show their data to the person holding the assembly when they load their data. Large screens show that data to anyone nearby, as well. They all have the same complexity, so use them according to your needs. For instance, something that gathers data when you point the assembly at something might be best to have a normal screen to tell you that data immediately. | ||
* One glass sheet is 2000 glass in an autolathe. An autolathe can make one light fixture battery for 20 glass. This means that one sheet of glass will net you 100 light fixture batteries. These are the weakest power cell in the game, holding only 120 MJ, but many basic gadgets have negligible power draw, making them the most useful option! They also start charged, unlike all other power cells. | * One glass sheet is 2000 glass in an autolathe. An autolathe can make one light fixture battery for 20 glass. This means that one sheet of glass will net you 100 light fixture batteries. These are the weakest power cell in the game, holding only 120 MJ, but many basic gadgets have negligible power draw, making them the most useful option! They also start charged, unlike all other power cells. | ||
| + | * If you find yourself doing a monotonous task each shift, you might be able to automate it with circuitry! | ||
| + | * There are kinds of math other than trig and algebra. Group theory and general theory of automata contain frameworks for extremely general machines, and aren't so hard to learn. | ||
* There is the potential for skilled players to make immensely-powerful circuits that can easily break the game just by existing. Please don't use them. We like circuits. They're fun. Please don't get them nerfed and removed. Please? | * There is the potential for skilled players to make immensely-powerful circuits that can easily break the game just by existing. Please don't use them. We like circuits. They're fun. Please don't get them nerfed and removed. Please? | ||
Revision as of 10:52, 30 June 2018
Science is now capable of building customizable machines, called integrated circuits, to fill any kind of niche imaginable, like a health monitor, a smart turret, a signaller, or maybe just something like a syringe - or something else entirely. Circuits are very complex, though, and take time to learn and work with, so here's a few primers to getting started.
Disclaimer: Simple circuits and even a lot of complex ones are doable just with knowledge about circuits. However, complex circuits can and often do require math knowledge. There are components that use trigonometry, complex flow control components that can operate differently based on conditions, and component combinations to use tons of arithmetic to get the desired result. Be ready!
Preface: Tools
To make any circuit, you'll need a few special tools. These all spawn in the circuit lab at roundstart, and more can be made with a protolathe once they're unlocked through R&D.
 Integrated Circuit Printer: Your essential tool for creating circuits. It consumes metal to print out assemblies and components, and can recycle those components and assemblies back into itself for metal.
 Circuit Wirer: Used to link parts together (as well as unlink them) to tell the machine how to function.
 Circuit Debugger: Used to change values directly, as well as to directly "pulse" inputs to activate them. Can write a single value multiple times, unlike a multitool.
 Circuit Analyzer: Can be used on any assembly to get a code that allows you to clone that circuit in a printer with the cloning upgarde.
 Assembly Detailer: Used to change the color of an assembly, for aesthetic purposes.
- File:Multitool.png Multitool: A slimmed-down combination of the wirer and the debugger. It can write values, pulse inputs, and wire pins together.
 Screwdriver: Lets you open and close the maintenance panel on assemblies. You should probably do this unless you want people to starts yanking pieces out and undoing tons of work.
 Wrench: Lets you anchor down assemblies so that they can't be picked up and moved around. Obviously, this doesn't work on drones.
This guide will assume you have all of these tools handy (except maybe the multitool.) Keep in mind that you can also print out wirers, debuggers, and analyzers from any circuit printer with metal.
Circuits are inherently complex. Really complex. Each part in a machine serves a specific purpose and communicates with other parts in various ways to do it, and circuits are designed in such a way that making a machine is also a matter of finding the most efficient way to do that so as to conserve space in the assembly. Here's a basic rundown of how it all works:
Fundamentals, Part I: Hardware, Space, and Complexity
Assemblies are what house machine components. Without an assembly, there is no machine. Every assembly also requires a power cell in order to power its components. The circuitry lab spawns with four by default, but more can be made from an autolathe (which is handily also inside the circuitry lab!) Other than power, there are two variables every assembly has:
- Space is the total amount of components that can fit in an assembly
- Complexity is the overall "complexity" score of the machine, which varies based on which components are added
Each component you insert takes up one point of space; there are no exceptions or deviations from this. However, every component also has a complexity score, depending largely on what it does. For instance, screens are very basic since they only serve one purpose - to display information - and so they only have a complexity score of 1, but integrated hypo-injectors inject, draw, and move reagents around. Because those are complex and serve many more functions, it has a complexity score of 20.
Making your circuits effectively is a matter of making the most use out of the complexity available to you, though space is very rarely a concern. The amount of complexity and space depends on the type of assembly, of which there are four:
 Assemblies are small-sized, and have a max space of 25 and max complexity of 75
 Mechanisms are normal-sized, and have a max space of 50 and max complexity of 150
 Machines are bulky-sized, and have a max space of 100 and max complexity of 300
 Drones are bulky-sized, and have a max space of 75 and max complexity of 225, but are the only assemblies that can move autonomously.
 Wall-mounted Assemblies come in three sizes corresponding to each of the three sizes of immobile assemblies, as the name implies, they can also be attached to walls.
Very simple designs, like flashlights or translators, can typically fit into assemblies. More complex ones, like blood draw kits, are usually mechanisms, and the most powerful designs are only capable of fitting into machines. Drones are more niche, but open up a huge amount of possibilities due to their ability to move.
Assemblies have different "types", such as type-a, type-b, and so on. The only difference between these is cosmetic, and they all have the same attributes regardless of which "type" you choose you use.
Fundamentals, Part II: Components, Pins, and Data Values
Components, or circuits (yes, it's confusing) are the parts of a machine that make it tick. They handle everything the machine does, from storing reagents to passive recharging to holding and throwing items. As mentioned in Part I, each component has a complexity value, which you can see by examining that component.
Components are created from a circuit printer. Many, however, are unavailable by default, and need an upgrade disk installed in order to print them. You can get the disk from the science protolathe after researching advanced data theory. You can recycle components back into the printer by hitting the printer with that component. Additionally, if you have an assembly full of components, you can quickly recycle all of them by hitting the printer with the assembly as long as the assembly's maintenance panel is open. After a short delay, this will start shaking out all the components into the printer, and once they're all gone, you can also recycle the assembly itself for a full metal refund.
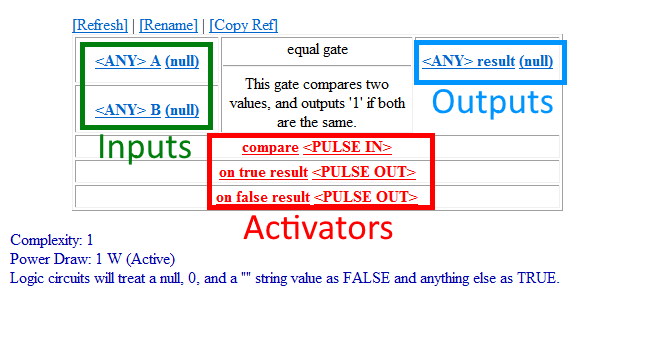
To communicate with the rest of the machine, components use pins. Pins are connected to other pins using a circuit wirer, either in the same component or in another component in the same machine, and are used to pass information through activation pulses. In short, they're the guts of your machines.
There are three types of pins:
Inputs store info on how the component operates. This might be how many reagents to inject, or how much power to transfer.
Outputs store info gained when the component does an operation, and are used as inputs in other components.
Activators tell the component to do certain things, like calculate how two values compare.
A circuit wirer is used to link pins together. By clicking on the name of a pin, you store that pin's data, and you can click on another pin to link those two pins, which will cause them to share values. You can also use the circuit wirer in your hand to switch between "wire" and "unwire" modes; in unwire, it works in reverse, by unlinking two pins that are already linked.
How different pins can be linked depends on the data type they use. There are several data types: String, Number, Ref, List, Bool, and null.
   “This is a string.”
   98.5
   the crowbar [Ref]
   list[2](("hydroponics tray"),("soil"))
   TRUE
   null
- Strings are text. They hold words, sentences, and the whole shebang. Numbers in a string are treated like letters.
- Numbers are numbers.
- Ref is shorthand for "reference" and points to a specific object in the game world.
- Lists can hold multiple data values of any other kind, like two strings or two numbers. They can also be interchanged, so you can have one string and one number.
- Bools are either TRUE (yes) or FALSE (no). The debugger doesn't have a bool function, and instead uses number assignments; 0 for FALSE, and 1 for TRUE.
- Null values point to nothing. It means that the value hasn't been set, or that it isn't being acquired correctly.
There are certain circuits to transform data values into other types; for instance, a "number to string" component will input a number and, when pulsed, output that number as a string.
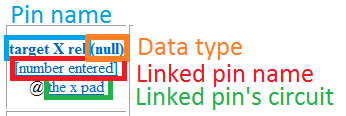
You can see data values, among other things, near a pin's name:
Some parts lack inputs, outputs, activators, or all three. Passive components like the tiny photovoltaic cell have no pins at all and will simply fill their function automatically when conditions are met.
Fundamentals, Part III: Pulses
As mentioned earlier, pulses are what tells a machine to operate. They're the only way to make it do anything, because even with data values, it can't use them unless it hears something telling it to. There are two types of pulses, PULSE_IN and PULSE_OUT.
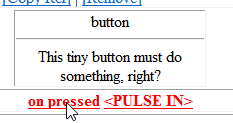
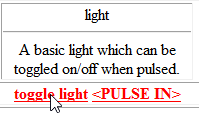
PULSE_IN pulses are "listeners." When they receive a command, they will run whatever function they're linked to. For instance, the "light" component has a PULSE_IN called "toggle light." When that toggle light receives a command, it will toggle the light component on or off. However, PULSE_IN components can link to other PULSE_IN components and work together with them. The "button" component uses a PULSE_IN called "on pressed" to communicate its pulses.
PULSE_OUT pulses are "speakers." They do not receive commands directly, but will output commands when certain actions transpire. For instance, the "reagent pump" component has a PULSE_OUT called "on transfer." Whenever the reagent pump successfully transfers reagents, it will send a command from "on transfer", and any PULSE_INs linked to that will receive a command. PULSE_OUT pins cannot be linked to other PULSE_OUT pins.
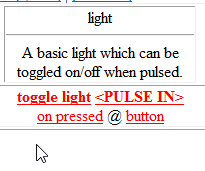
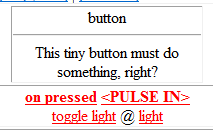
Understanding pulse links is essential to making circuits work. As an example, the button component's "on pressed" can be linked to the light component's "toggle light" using a circuit wirer. As long as the assembly has power, this will cause the light to toggle on and off when the button is pressed by using the assembly in your hand. You can also link multiple pulses together; even when it's linked to "toggle light", you can also put that "on pressed" onto a beeper circuit's "play sound" to make it play its sound with the value it's been assigned. This will make pressing the button toggle the light and play a sound.
A Note on "push ref"
Some circuits, especially those with an output pin that references itself, have a PULSE_IN pin called "push ref." When pulsed, this pin will cause any other components this part is linked to via that reference to actually obtain the reference for it. However, if you don't do this, then it will refer to the self-reference of the component as null, thus making it impossible to work. For this reason, "push ref" should be pulsed exactly once in order to synchronize it with other components.
The easiest way to do this is with a "starter" component, in the Power - Passive section. This component will pulse out a single time whenever the machine gains power. Linking the starter's "pulse out" to any "push ref" pins in your circuit is essential to getting them to work. You can also assign them in other ways, but note that pulsing "push ref" while the machine is running will cause it to malfunction and not work with no clear indicator.
Fundamentals, Part IV: Flow Control
Flow control is a term used generally for programming languages for determining in what order code is executed. This principle also applies to integrated circuits. The proper management of how a pulse goes to each component in the correct order is very important for large or complex machines.
Fortunately, there are some components to help with organizing your flow control. For example, there are pulse splitters to allow for cleaner wiring by transforming a single input into multiple outputs. Delay timers also exist so that you can make sure everything goes off at the right time (although it's best if your machine is not dependent on that, which is known as a race condition in programming.) Many circuits will also propagate a pulse if it passes a certain condition, like logic gates, ensuring that something will occur only if you want it to.
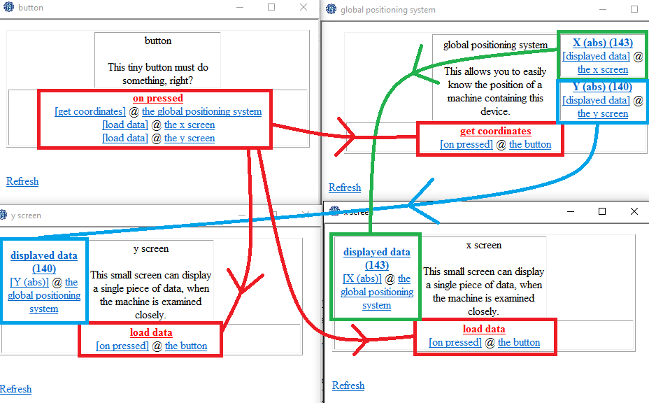
Here's a somewhat terrifying chart illustrating the concept:
When the button is pressed, the first thing to happen is for the global positioning system to gather its coordinates. Immediately after this, the X screen loads its data, and then the Y screen. These screens have the X-coordinate and Y-coordinate from the GPS respectively as their displayed data. Because the GPS gathers coordinates before the screens load their data, it displays the coordinates without a hitch, but if the screens were to load first, then it would not display the coordinates correctly, instead displaying the coordinates last recorded - so if you pressed it at one spot and then moved a few rooms away and pressed it again, the coordinates displayed would be for the first spot, even though the GPS's recorded data is in the new room, because the screens updated before the coordinates did!
Making a Basic Circuit: Step-by-Step
To put all this knowledge together, here's a step-by-step guide to making a very simple circuit flashlight. This will use a button to toggle the light on and off, and we'll also put a tiny photovoltaic cell inside of it so that it charges itself from being in the light - enough to counter its own power draw, making it self-charging!
First, print any assembly - we'll use a type-a one for this purpose - a light component (Output), a button component (Input), and a tiny photovoltaic cell (Power - Passive).
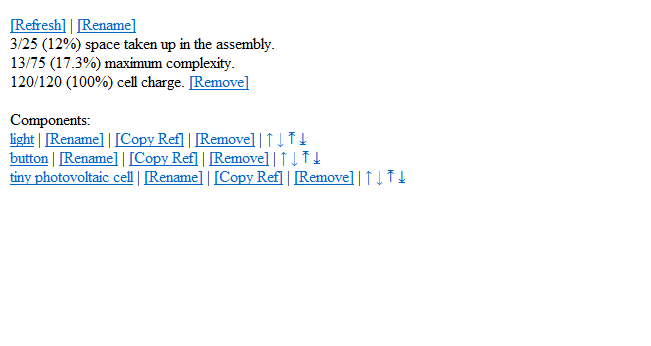
Once you have all of your parts ready, insert them into the assembly one at a time by attacking the assembly with them. You should also put in a variety of power cell; the roundstart ones work, or you can make one from the autolathe. For this purpose, we'll use a light fixture battery from the autolathe, due to its extremely cheap cost and compact size. Once you've done that, your assembly interface will look like this:
Take note of the space and complexity. To get this thing to actually, work, we're going to need to link the button's "on pressed" to the light's "toggle light" using our circuit wirer. Click on the button's name, then put the circuit wirer in your hand and click on "on pressed" to store it in the data buffer. Then click "Return to Assembly", navigate to the light, and click "toggle light", also with the ciruit wirer, to link them.
And voila! The two are linked. You can see this on both of their interfaces:
Now that our machine is finished, use your screwdriver to close the maintenance panel so the part list doesn't come up every time we turn it on or off:
We now have a complete circuit that functions as a flashlight and charges itself in the light to ensure that it won't run out of power. To test it, head to a dark area - we'll say maintenance, and try turning it on and off.
"Let there be light"
And there you go! You now have a fully functional flashlight. But don't stop there - experiment! With a little bit of experimentation by using an advanced light, a debugger to manually set its brightness and color, and linking in the same way, you can make something closer to a portable floodlight with a little bit more effort. And this all barely scratches the surface of what circuits are capable of - it's possible to make portable gun chargers, assemblies that grind up food you hit them with and then inject it into you directly, translators that let people communicate even with no known languages, and a nearly limitless amount of other gadgets, tools, and devices to fill any purpose you can imagine.
Welcome to integrated circuits, bucko.
"Nightmaresbane"
Common Concepts and Important Notes
Although the basics are out of the way, there are some helpful concepts as well as some things to know that should be kept in mind when making integrated circuits. Feel free to add to this list with your own!
- Tiny photovoltaic cells are enough to power most simple gadgets and devices indefinitely.
- Starter components are highly important, and can be used to cause things like screens to gain their information when powered if they should always have that information to begin with.
- You can make a one-second ticker by linking two "one-sec delay circuit" components together, and pulsing one through starter, so that they indefinitely pulse each other.
- Light-emitting diodes have a very small complexity cost (0.1), making them the best way to track status of Bool variables on examining.
- Small screens only show their data on examine. Screens show their data to the person holding the assembly when they load their data. Large screens show that data to anyone nearby, as well. They all have the same complexity, so use them according to your needs. For instance, something that gathers data when you point the assembly at something might be best to have a normal screen to tell you that data immediately.
- One glass sheet is 2000 glass in an autolathe. An autolathe can make one light fixture battery for 20 glass. This means that one sheet of glass will net you 100 light fixture batteries. These are the weakest power cell in the game, holding only 120 MJ, but many basic gadgets have negligible power draw, making them the most useful option! They also start charged, unlike all other power cells.
- If you find yourself doing a monotonous task each shift, you might be able to automate it with circuitry!
- There are kinds of math other than trig and algebra. Group theory and general theory of automata contain frameworks for extremely general machines, and aren't so hard to learn.
- There is the potential for skilled players to make immensely-powerful circuits that can easily break the game just by existing. Please don't use them. We like circuits. They're fun. Please don't get them nerfed and removed. Please?
